void setup() {
// put your setup code here, to run once:
//Regarding the code: Void setup is the beginning of everything, we use it to make the initial configurations, in our case the initialization of pins.
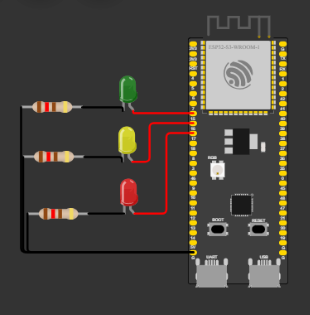
pinMode(15,OUTPUT);
pinMode(16, OUTPUT);
pinMode(17, OUTPUT);
/*at the beginning we define the outputs (LEDS), we anchor them to a number, this number is one of the inputs that the ESP 32-S3 has, these went
directly to the LEDS, these numbers are 15, 16 and 17, they are general inputs that with the photo at the beginning we see that they can be used
for almost everything (GPIO), the other end of the LED was connected to the GND of the ESP, this performs the function to close the circuit.*/
}
/*Then we start with a void loop to insert our code below and it is repeated while the ESP is connected to the current, with digitalWrite we control
the digital pinsof the ESP, the LEDS, the HIGH and LOW are used so that they turn off and on every once in a while, we apply this time interval
with a delay(); this will add a delay of the value you want.*/
void loop() {
// put your main code here, to run repeatedly:
digitalWrite(15, HIGH);
delay(100);
digitalWrite(15,LOW);
delay(100);
digitalWrite(16, HIGH);
delay(100);
digitalWrite(16,LOW);
delay(100);
digitalWrite(17, HIGH);
delay(100);
digitalWrite(17,LOW);
delay(100);
}
#include
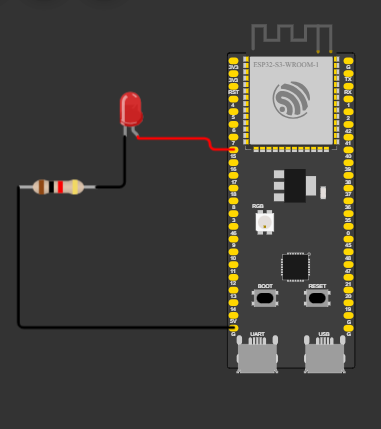
const int ledPin = 15; // El pin GPIO al que está conectado el LED
BLECharacteristic *pCharacteristic;
void setup() {
BLEDevice::init("myEspS3");
BLEServer *pServer = BLEDevice::createServer();
BLEService *pService = pServer->createService("0000180A-0000-1000-8000-00805F9B34FB");
pCharacteristic = pService->createCharacteristic(
"00002A29-0000-1000-8000-00805F9B34FB",
BLECharacteristic::PROPERTY_WRITE
);
pService->start();
BLEAdvertising *pAdvertising = BLEDevice::getAdvertising();
pAdvertising->addServiceUUID(pService->getUUID());
pAdvertising->setScanResponse(true);
pAdvertising->setMinPreferred(0x06);
pAdvertising->setMinPreferred(0x12);
BLEDevice::startAdvertising();
pinMode(ledPin, OUTPUT);
}
void loop() {
}
A GCC error in the Arduino IDE refers to a problem that occurs during the compilation or linking process of the C++ source code using the GCC compiler. These errors can be caused by syntax errors, configuration issues, incompatible libraries, variable or function name conflicts, missing declarations or definitions, among other reasons.
To fix a GCC error in the Arduino IDE, carefully review the error messages to identify the underlying cause. Check for programming errors in the source code, such as syntax mistakes or missing elements. Ensure that the libraries being used are compatible with your Arduino IDE version.
The error message "fatal error: bits/error_constants.h: No such file or directory" indicates that the compiler is unable to find the specified header file "error_constants.h" in the "bits" directory. This error commonly occurs when there is a missing or misplaced system header file that is required for the compilation process. The "bits" directory typically contains low-level header files used by the compiler.
In our case, probably there was an installation malfunction, as we had to delete one library (Arduino 15) to use BLEDevice, we might deleted some important file, even though when we put the library again it didn't work. Our conclusion is 1. Using another PC or 2. Redownload the Arduino app.
ESP RainMaker: With this application, our goal was to configure and manage our ESP32 S3 via Bluetooth. We could also remotely configure and update it. The ultimate objective was to have complete control of the ESP via Bluetooth, and this application allowed us to achieve that.
Thunkable: This application is also similar in the sense that it allows us to configure it for Bluetooth communication. The major difference is that Thunkable is a low-code or no-code development platform. It uses blocks similar to App Inventor, another similar application. With Thunkable, we can expand libraries of components and integrate external services and APIs. Considering this, we could have made significant progress with this platform as well.