Arduino is at same time an hardware and a software, an open hardware: you can copy it, change it, freely and an open source software in a integrated development environment (IDE). You have access to everything all the data and hardware components and all the software components and the source code (codi font) producing the software. Is the opposite propietary code and propietary hardware.
Arduino software is considered a C++ derivative and at the same time a Processing related software.
Processing is an open source software previous to Arduino software and compatible with Arduino, coitaining many open source Processing libraries of computer vision or Arduino as example:
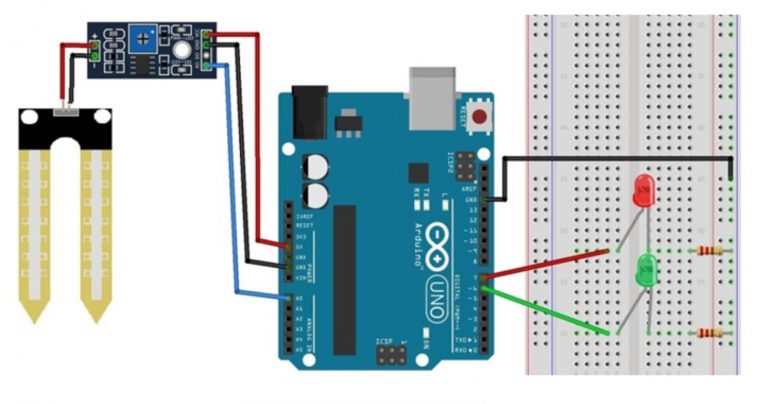
This is the Arduino code corresponding to my Humidity Project in the general project of Agriculture Robotics. The objective is mesure de humidity of a plant and depending on the soil moisture or humidity. A red LED will be switch ON in case of low humidity and a green LED will be switch ON in case of high soil moisture.
Next step will be to change LEDs and to use a water pump, relays to water the plant.
My code for the YL-69 soil moisture sensor and the LEDs is the following:
/* int means integer variable corresponding to a integer number A0, 6 and 7 are integer numbers, A0 is a special case.
Double forward slash means comment in Arduino language. rainPin, greenLED and redLED are variables invented in order to identify
the pins (connectors of the Arduino). For variables names we follow  the camel case, that is the first letter of the first
name in lower cases and the second name in the first letter will be upper cases (other posibilities of convention for writting
variables are used in other languages re snake case: "for-example-this" and in camel case is this: "forExampleThis").
It is imposible to start a variable name with a number or with special caracters corresponding to keywords used in instructions.*/
/* Other types of variables in Arduino are boolean (true/false), byte (0-255), char (character -128 - +127), int (-32768 - +32767),
long (very long numbers) and float (floating point numbers). Boolean, byte and char are 8 bits long, 2^8=256 different values.
integer is 16 bits (2^16=65536) in length, and finally, long and float are 32 bits (2^32=4294967296) length. There are
signed and unsigned variables, if the variable is signed the value is divided by 2 (example: 2^16=65536/2=32768 integer variables
will go from -32768 to +32767, one number is 0 this is why I am reducing the last number by 1 unit). I can declare a long
variable for mesuring miliseconds or microseconds, signed or unsigned? What is correct? Unsigned long time; means always positive
for time.*/
// When I declare a variable I create a space in the computer's memory with a name.
// It is interesting to declare variables of the right size.
// If I add before int the word const it makes impossible to change
const int rainPin = A0;
/* In Arduino Uno there are 6 analog INPUTs of 10 bits (1024 levels) and in ESP32-S3 there are 20 analog INPUTs of 12 bits (4096 levels). We are
going to calculate the resolution of the sensors and the analog INPUTs, taking into account that Arduino Uno is a 5V microcontroller and ESP-32 is a 3.3V
microcontroller. 3.3V / 4096= 0.00080566406V= 0.806mV, 5V / 1024= 0.048828125V= 4.88mV. Level 0 is 0V in Arduino, level 1 is 4.88mV, level 2 is 9.76mV,
level 500 is 2.44V and level 1023 is 5V. Can I mesure 6mV? No, the solution is a better ADC (Analog Digital Converter) of more bits, for example ADS 1115 is
a ADC of 16 bits (65536 levels) of 5V, 5V / 65536= 0.08mV. The advantatge is that we are acapble to detect more values (more accurate) with more precission.
Raspberry PI ver.4 doesn't have any ADC tht is any analog INPUT, connecting ADS 1115 when is avaliable. */
const int greenLED = 6;
const int redLED = 7;
// You can adjust the threshold value.
int thresholdValue = 1400;
/* A variable can be a global variable if it is defined at the begining of the code or local if it is
defined inside a function or void block. If I do not assign a initial value to a variable it will be 0 as a
default value.*/

void setup(){
/* setup is a block of code or function including the general settings, for example if the pin is an INPUT
or an OUTPUT, the initial values of my circuit the green and the red LED will be OFF or LOW. In the pinMode
function we use the previous global variables with known names, for example pinMode(rainPin, INPUT); is the
same as pinMode(A0, INPUT); because it is easier to understand because we give this variable name
to the A0 pin because is the first analog INPUT in the Arduino.*/
/* Analog INPUT in Arduino Uno is a 10-bit analog to digital converter (ADC) that means 2^10=1024 values from 0-1023,
In ESP-32 microcontroller there are 12-bit ADC that means 2^12=4096 values from 0-4095,
in ADS1115 is 16-bit ADC thatmeans 2^16=65536 values from 0-65535.*/
  pinMode(rainPin, INPUT);
  pinMode(greenLED, OUTPUT);
  pinMode(redLED, OUTPUT);
  digitalWrite(greenLED, LOW);
  digitalWrite(redLED, LOW);
  Serial.begin(9600);
   /* digitalWrite means to write a two state value (HIGH, LOW, and some time in 0 and 1) in digital inputs, we need to define first the pin mode as
   an INPUT and OUTPUT, deppending on the features fo the pin, for example; if the pin is A0, i can not put un digital, just analgoic, because from A0-A5
   pin are pins that only are inputs values of 10 bits (1024 values).*/
    */Arduino: 5volts, ESP-32: 3.3volts.
  //ESP-32: Has 12 bits and 2^12=4096 values.
  //Resulotion capacity of distinguixin differents values are bigger ESP-32; 3,3/4096mV, Arduino;5/1024mV
   /* Serial.begin means serial communications between devices (microcontroller and PC) and the number is the speed in bits per second or bouds, other
   common speeds are: 9600, 57600, and 115200.*/
}

void loop() {
  // read the input on analog pin 0:
  int sensorValue = analogRead(rainPin);
  Serial.print(sensorValue);
  if(sensorValue < thresholdValue){
    Serial.println(" - Doesn't need watering");
    digitalWrite(redLED, LOW);
    digitalWrite(greenLED, HIGH);
  }
  else {
    Serial.println(" - Time to water your plant");
    digitalWrite(redLED, HIGH);
    digitalWrite(greenLED, LOW);
  }
  delay(500);
}
int greenLED = 6;
int redLED = 7;
// you can adjust the threshold value
int thresholdValue = 1400;

void setup(){
  pinMode(rainPin, INPUT);
  pinMode(greenLED, OUTPUT);
  pinMode(redLED, OUTPUT);
  digitalWrite(greenLED, LOW);
  digitalWrite(redLED, LOW);
  Serial.begin(9600);
}

void loop() {
  // read the input on analog pin 0:
  int sensorValue = analogRead(rainPin);
  Serial.print(sensorValue);
  if(sensorValue < thresholdValue){
    Serial.println(" - Doesn't need watering");
    digitalWrite(redLED, LOW);
    digitalWrite(greenLED, HIGH);
  }
  else {
    Serial.println(" - Time to water your plant");
    digitalWrite(redLED, HIGH);
    digitalWrite(greenLED, LOW);
  }
  delay(500);
}
This is the image of the circuit: